Tips and Tricks
Developing applications with ThingWorx can be greatly enhanced by utilizing the right set of tools and widgets. On top of the IQNOX Widget Pack, there are several open-source widgets and tools that can be used to improve the development process. These are developed and maintained by developers at IQNOX in an open source manner.
These tools not only speed up the development process but also add advanced functionalities, improve code quality, and enhance the user experience. This document introduces several open-source widgets and provides practical examples, use cases, and best practices, including event handling techniques and security considerations.
Widgets
BMCoreUI Widgets
BMCoreUI Widgets is a comprehensive package of individual extensions designed to facilitate and accelerate development in ThingWorx. These widgets extend the capabilities of ThingWorx Composer by providing advanced UI components and functionalities not available out of the box.
- BMCoreUI: Provides foundational UI components and utilities for building complex interfaces.
- BMView: Offers advanced view management for creating dynamic and responsive layouts.
- BMCollectionView: Enables sophisticated collection views for displaying large datasets efficiently.
- BMPresentationController: Manages the presentation of views and modals, improving navigation flow.
- BMMenu: Implements customizable menus for enhanced navigation and user interaction.
- BMCodeHost: Allows embedding custom code and scripts directly into mashups, facilitating advanced logic implementation.
Why Use BMCoreUI Widgets?
- Enhanced UI/UX: Provides more versatile and responsive UI components, improving the end-user experience.
- Simplified Development: Reduces the need for custom widget development by offering ready-to-use components.
- Advanced Functionality: Enables the implementation of complex features and interactions within mashups.
- Improved Code Management: Facilitates better organization and maintainability of code through modular components.
Dependencies
- Monaco Editor: Required for code editing capabilities within ThingWorx.
Installation
- Download here

- Import into ThingWorx: In ThingWorx Composer, navigate to Import/Export > Import, and select the downloaded extension file.
Monaco Editor
ThingWorx Monaco Editor is an extension that replaces the default script editor in ThingWorx Composer with the powerful Monaco Editor (the editor behind Visual Studio Code). It offers an enhanced coding experience with features such as:
- Multiple Cursors and Selections: Edit multiple lines simultaneously.
- IntelliSense and Autocompletion: Benefit from code suggestions and auto-completion.
- Syntax Highlighting and Error Checking: Improve code readability and reduce errors.
- TypeScript Support: Write ThingWorx services in TypeScript for better code organization and type safety.
Why Use Monaco Editor?
- Improved Productivity: Enhances coding efficiency with modern editor features.
- Better Code Quality: TypeScript support leads to cleaner, more maintainable code.
- Familiar Environment: Provides a coding experience similar to popular IDEs like Visual Studio Code.
Installation
Follow the Installation Instructions on the GitHub repository to set up the Monaco Editor in your ThingWorx environment.
Use Cases
Event bubbling
In web development, event bubbling is a technique where an event triggered on a child element propagates up to parent elements. In ThingWorx, implementing event bubbling between mashups (especially from child to parent mashups or popups) requires a structured approach due to the encapsulated nature of mashups.
This section provides a step-by-step guide on how to trigger a notification on the parent mashup from a child mashup using TypeScript classes and the BMCodeHost widget.
Why Use Controllers and TypeScript Classes?
- Modularity: Organize code into reusable components.
- Type Safety: Catch errors during development with TypeScript's type checking.
- Reusability: Share logic across different mashups.
- Enhanced Functionality: Implement complex logic beyond standard bindings and services.
Overview of the Approach
To enable communication between the child and parent mashups:
- Parent Mashup Controller: Listens for events and triggers actions (e.g., showing a notification).
- Child Mashup Controller: Sends events to the parent mashup using
postMessage. - (Optional) Master Mashup Controller: Defines shared interfaces and types for consistency and type safety across the application.
The Controller used in the master will contain interfaces for other controllers in the application. This will ensure it's read throughout the application. Note that it's not required for event bubbling to work, but provides quality of life features, such as autocomplete and type safety.
The master Controller is also where you can put any other functionality on the window to be used throughout the application controllers.
There are two methods for achieving this result. This first (and recommended one) is using Post Message, which requires setting up event listeners and triggering a postMessage and is a more straightforward approach which lets the browser handle the event execution order.
The second method is a Direct Service Call, which, as the name implies, is an approach that lets ThingWorx directly call methods by their reference saved on the window. While not preferred and a bit more cumbersome, this method can ensure better reference and type safety on the controllers.
Let's go through a step by step tutorial for both methods in how to implement event bubbling in ThingWorx using Code Host.
Method 1: Using postMessage
The window.postMessage API allows for safe cross-origin communication between Window objects. It's particularly useful for sending messages from a child mashup to its parent mashup.
Security Considerations
When using postMessage, it's crucial to implement security measures to prevent unauthorized access or malicious attacks.
Key Security Measures:
- Origin Validation: Always check
event.originto ensure the message is from a trusted source. - Source Validation: Verify
event.sourceif necessary to confirm the sender's identity. - Message Structure Validation: Use a specific message format and validate the message contents.
I. The Master (optional)
- Create a Master Mashup : This mashup will hold shared definitions and can be included in other mashups.
- Add a
TypeScript ClassWidget : This serves as the master controller. - Define Shared Interfaces and Types :
// Class wrapper
@TWWidgetDefinition
class MasterController extends TypescriptWidget {
    // This can be left empty for now
    beforeDestroy() {}
}

// Define the structure of messages
interface ApplicationMessage {
    source: string; // Unique identifier for your application
    type: string;   // Type of message
    payload: any;   // Data payload
}
II. The Parent Mashup
- Create the Parent Mashup : The main mashup where you want to display notifications or perform actions.
- Add Widgets :
TypeScript Class(Controller)Window Controller(for displaying the child mashup). ANavigation Widgetcan also be used.- Notification Widget (e.g.,
IQNOX Status Message Widget) - Button to open the popup (e.g.,
IQNOX Buttonlabeled "Open Popup")
-
Implement the Parent Controller :
-
Paste this code inside the Controller
// The comment lower is an import for the controller in the Master mashup.
// It must be written EXACTLY as below for it to work (as a comment and with the same spacing)
// First name is the display name of the Controller, second is the mashup name.

//#import MasterController from MasterMashup
@TWWidgetDefinition
class ParentController extends TypescriptWidget {
    constructor() {
        super();

        // Bind the message handler
        window.addEventListener("message", this.messageHandler, false);
    }

    // Properties bound to the UI
    @property(bindingSource) notificationTitle!: STRING;
    @property(bindingSource) notificationMessage!: STRING;
    @property(bindingSource) actionData!: TWJSON;

    // Events to trigger UI actions
    @twevent showNotification!: TWEvent;
    @twevent performAction!: TWEvent;

    // Single message handler
    messageHandler = (event: MessageEvent) => {
        // Security: Validate the origin
        if (event.origin !== window.location.origin) return;

        // Ensure message structure is as expected
        const data = event.data as ApplicationMessage;

        // Security: Validate the message source
        if (data.source !== 'MyApplication') return;

        // Handle messages based on type
        switch (data.type) {
            case 'NOTIFICATION':
                this.handleNotification(data.payload);
                break;
            case 'ACTION':
                this.handleAction(data.payload);
                break;
            // Add cases for additional message types
            default:
                console.warn(`Unhandled message type: ${data.type}`);
        }
    };

    // Handle notification messages
    handleNotification(payload: { title: string; message: string }) {
        this.notificationTitle = payload.title;
        this.notificationMessage = payload.message;
        this.showNotification();
    }

    // Handle action messages
    handleAction(payload: any) {
        this.actionData = payload;
        this.performAction();
    }

    beforeDestroy() {
        // Clean up the event listener
        window.removeEventListener("message", this.messageHandler, false);
    }
}
Explanation:
messageHandlerFunction : Centralizes the handling of all incoming messages.- Security Checks : Validates
event.originanddata.source. - Switch Statement : Determines action based on
data.type.
Set Up Bindings :
- Bind
notificationTitle,notificationMessage, andshowNotificationto the notification widget's properties and events. - Bind the button's
Clickedevent to theWindow Controllerto open the child mashup.
III. The Child mashup
- Create the Child Mashup : The mashup that sends messages to the parent mashup.
- Add Widgets :
TypeScript Class(Controller)- Input Widgets (e.g.,
IQNOX Input) for user input - Button to send the message (e.g.,
IQNOX Buttonlabeled "Send Message")
- Implement the Child Controller :
// The comment lower is an import for the controller in the Master mashup.
// It must be written EXACTLY as below for it to work (as a comment and with the same spacing)
// First name is the display name of the Controller, second is the mashup name.

//#import MasterController from MasterMashup

@TWWidgetDefinition
class ChildController extends TypescriptWidget {
    // Properties for user input
    @property(bindingTarget) title!: STRING;
    @property(bindingTarget) message!: STRING;

    // Service to send a notification message
    @service sendNotification() {
        const message: ApplicationMessage = {
            source: 'MyApplication',
            type: 'NOTIFICATION',
            payload: {
                title: this.title,
                message: this.message,
            },
        };
        window.postMessage(message, window.location.origin);
    }

    // Service to send an action message
    @service sendAction() {
        const message: ApplicationMessage = {
            source: 'MyApplication',
            type: 'ACTION',
            payload: {
                // Include action-specific data here
            },
        };
        window.postMessage(message, window.location.origin);
    }

    beforeDestroy() {}
}
Explanation:
sendNotificationService : Sends a notification message to the parent.sendActionService : Sends an action message to the parent.- Consistent Message Structure : Follows the
ApplicationMessageinterface for consistency.
Set Up Bindings:
- Bind input widgets to
titleandmessage. - Bind buttons to
sendNotificationandsendActionservices.
IV. Final Steps
-
Configure the
Window Controller: In the parent mashup, set themashupNameproperty to the child mashup's name. -
Test the Communication :
- Run the parent mashup.
- Open the child mashup using the "Open Popup" button.
- Enter data and trigger messages.
- Observe the parent mashup responding appropriately.
Benefits of This Approach
- Scalability : A single message handler can manage numerous message types.
- Maintainability : Centralized message handling simplifies updates and debugging.
- Modularity : Multiple child mashups can communicate with the parent using the same structure.
Method 2: Using Direct Service Calls
An alternative to postMessage is to expose functions directly on the window object. While this method provides type safety and direct access to functions, it requires careful management to avoid polluting the global namespace and potential conflicts, and requires you to remove references when they are no longer needed to prevent memory leaks.
The implementation steps are similar to the postMessage method but differ in how the child mashup communicates with the parent.
I. Master Controller (optional)
@TWWidgetDefinition
// Widget DisplayName is changed by renaming the class
class MasterController extends TypescriptWidget {
    // This can be left empty for now
    beforeDestroy() {}
}

// Add types on the Window object the API that can be used by other controllers
interface Window {
  // Controller name for the event source (should match the actual controller name)
  // Must be made optional to able to delete it in the parent mashup `beforeDestroy()`
  // This declares the methods/properties that are available to be used from other controllers.
  // Note that all of the other methods may be available, but other controllers should only use the ones declared here
  ParentController?: {
    // Method that we want to trigger
	  SendNotification: (title: string, message: string) => void;
  };
}
II. Parent Mashup Controller
// The comment lower is an import for the controller in the Master mashup.
// It must be written EXACTLY as below for it to work (as a comment and with the same spacing)
// First name is the display name of the Controller, second is the mashup name.

//#import MasterController from MasterMashup

@TWWidgetDefinition
class ParentController extends TypescriptWidget {
    constructor() {
        super();
        // Expose the controller on the window object
        window.ParentController = this;
    }

    // Properties and events as before
    @property(bindingSource) notificationTitle!: STRING;
    @property(bindingSource) notificationMessage!: STRING;
    @twevent showNotification!: TWEvent;

    // Function to be called by the child mashup
    sendNotification(title: string, message: string): void {
        this.notificationTitle = title;
        this.notificationMessage = message;
        this.showNotification();
    }

    beforeDestroy() {
        // Clean up the window object
        delete window.ParentController;
    }
}
III. Child Mashup Controller
// The comment lower is an import for the controller in the Master mashup.
// It must be written EXACTLY as below for it to work (as a comment and with the same spacing)
// First name is the display name of the Controller, second is the mashup name.

//#import MasterController from MasterMashup

@TWWidgetDefinition
class ChildController extends TypescriptWidget {
    // Properties for user input
    @property(bindingTarget) title!: STRING;
    @property(bindingTarget) message!: STRING;

    // Service to call the parent's function directly
    @service sendNotification() {
        window.ParentController?.sendNotification(this.title, this.message);
    }

    beforeDestroy() {}
}
Same as before, if all steps were followed correctly, a notification with your chosen title should appear on the top right corner of the screen.
CSS Highlight
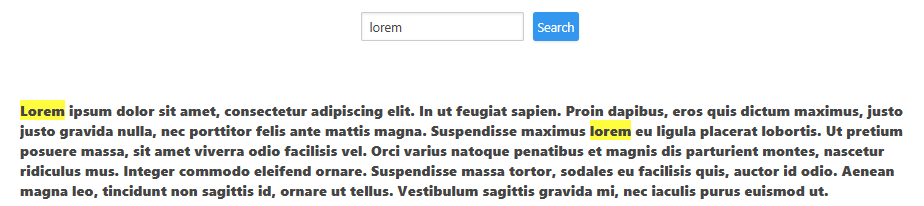
The CSS ::highlight() pseudo-element allows you to apply custom styles to text ranges highlighted programmatically (e.g., via Range or Selection). The most common use case is highlighting when searching/filtering (see example below)
This section provides a step-by-step guide on how to implement CSS Highlight on a text within a mashup using TypeScript classes and the BMCodeHost widget.
Overview of the Approach
The following components are needed to implement this functionality:
-
Mashup Controller: Location where the text will be highlighted
-
Master Controller: Implement CSS Highlight logic and storage.
Note: The Master Controller is only needed if search is required across multiple mashups. Otherwise, the text highlight logic can be implemented in the mashup directly
-
Master Stylesheet: Define styles for the text(s) to be highlighted
The Controller used in the master will create and store the API to be used by other controllers in the application. This will ensure it's read throughout the application.
I. The Master
- Create a Master Mashup : This mashup will hold the logic that creates the CSS Highlight and the Stylesheet to be applied.
- Add a
TypeScript ClassWidget : This serves as the master controller. - Define the "public API" which can be imported by any mashup :
@TWWidgetDefinition
class Test_Highlight_Master_Controller extends TypescriptWidget {
	constructor() {
		super();
        // Assign the `publicApi` to a window property which we can call on.
		window.Runtime = this.publicApi;
	}

    /** Stores targeted selectors, keyed by text searched */
	private highlightSetLastSearchMap: Record<string, { searchText: string; targetSelector: string }> = {};

    /**
     * Highlights text using CSS Highlight
     * @param setName Name of the filter. Used to differentiate between multiple filters.
     * @param targetSelector Target text class name
     * @param searchText  Value to search for
     */
	private highlightText(setName: string, targetSelector: string, searchText?: string): void {
        // Check if the `searchText` changed in the context of the `setName`
		if (this.highlightSetLastSearchMap[setName]?.searchText != searchText) {
            // Replace the entry of `searchText` for the specified `setName`
			this.highlightSetLastSearchMap[setName] = { searchText: searchText ?? '', targetSelector };
		}

		// Clear the HighlightRegistry to remove the
		// previous search results.
		CSS.highlights.clear();

		// Clean-up the search query and bail-out if
		// if it's empty.
		const str = searchText?.trim().toLowerCase();
		if (!str) {
			return;
		}

		// Find all text nodes in the article. We'll search within
		// these text nodes.
		const allTextNodes = [];
		const targetElements = document.querySelectorAll(targetSelector);
		for (const element of targetElements) {
			const treeWalker = document.createTreeWalker(element, NodeFilter.SHOW_TEXT);
			let currentNode = treeWalker.nextNode();
			while (currentNode) {
				allTextNodes.push(currentNode);
				currentNode = treeWalker.nextNode();
			}
		}

		// Iterate over all text nodes and find matches.
		const ranges = allTextNodes
			.map((el) => ({ el, text: el.textContent?.toLowerCase() }))
			.map(({ text, el }) => {
				const indices = [];
				let startPos = 0;
				while (startPos < text!.length) {
					const index = text!.indexOf(str, startPos);
					if (index === -1) break;
					indices.push(index);
					startPos = index + str.length;
				}

				// Create a range object for each instance of
				// str we found in the text node.
				return indices.map((index) => {
					const range = new Range();
					range.setStart(el, index);
					range.setEnd(el, index + str.length);
					return range;
				});
			});

		// Create a Highlight object for the ranges.
		const searchResultsHighlight = new Highlight(...ranges.flat());

		// Register the Highlight object in the registry.
		CSS.highlights.set(setName, searchResultsHighlight);
	};

	public publicApi = {
		/**
		 * Highlights text using CSS Highlight
		 * @param setName Name of the filter. Used to differentiate between multiple filters.
		 * @param targetSelector Target text class name
		 * @param searchText  Value to search for
		 */
		highlightText: (setName: string, targetSelector: string, searchText?: string): void => {
			this.highlightText(setName, targetSelector, searchText);
		},
	}

	// Override any widget method needed; afterRender and renderHtml can be
	// overridden to display this widget at runtime
	beforeDestroy(): void { }
}

interface Window {
	Runtime: typeof Test_Highlight_Master_Controller.prototype.publicApi;
}
- Add a
StylesheetWidget : This is where styles are stored. - Define the styles to apply to the highlighted text :
/* For each `setName` you can create a style */
::highlight(loremFilter) {
    background-color: yellow;
}
I. The Mashup
- Create a Mashup : This mashup is where the CSS highlight text is set.
- Add a
TypeScript ClassWidget : This serves as the mashup controller. - Implement the Mashup Controller :
//#import Test_Highlight_Master_Controller from Test_Highlight_Master

@TWWidgetDefinition
class Test_Highlight_Page_MU_Controller extends TypescriptWidget {
    // Text to highlight
	@property(bindingTarget) set searchParam(value: STRING) {
        // On set, call the `highlightText` method
        // Pass the unique setName, the css class (should be on the texts to be highlighted)
        // and the value to highlight
		window.Runtime.highlightText('loremFilter', '.textToHighlight', value);
	};


	@property(bindingSource) text: STRING = ``; // Fill with a lorem ipsum paragraph or a text of your choice.


	// Override any widget method needed; afterRender and renderHtml can be
	// overridden to display this widget at runtime
    beforeDestroy() {}
}
- Add a
IQNOX InputWidget - Bind
ValuetoTest_Highlight_Page_MU_Controller.searchParam - Add a
IQNOX LabelWidget - Bind
Test_Highlight_Page_MU_Controller.textto the new label and set properties:- CustomClass -
textToHighlight
- CustomClass -
Open the Mashup at Runtime and type in the input any characters that might match the text, and if all the steps were followed correctly, the input characters should be highlighted in a bright yellow.